 High-Relief cables (HRC)
I am pleased to introduce a general improvement for conventional cables and arans. It is very easy – just add two purl stitches to any* cable or aran to create this distinctive appearance. These added purls push the adjacent knit stitches up, whilst also hiding behind them, and so are not visible – the cables have a similar width as before, but are much fuller.
* Rope cables (e.g. 2×2, 3×3, etc.) and traveling cables (also called aran lines) are easily worked as HR cables. Some complicated, multi-cable patterns may require more effort to convert to the HR cables style.
You’ll find everything you need in this article to get the most out of your High-Relief cables.
Characteristics of the High-Relief cables:
- The cables are raised and emphasised (they look like they are on a pedestal).
- They pop out of the background, even if surrounded by knit stitches.
- They keep their shape even after washing, blocking, ironing and stretching. Why? Because they do not just look three-dimensional – they are sculptural.
- They are much smoother and neater then conventional arans and cables.
- They don’t have annoying elongated last stitches – it’s just magic!
- They are quite thick and rounded, and therefore they are pretty strong and warm (excellent for hats, gloves).
- They are highly visible even when worked with a variegated yarn.
- Another fantastic quality is that they are reversible** – High-Relief rope cables have different, intriguing cables on the reverse side. This makes them a perfect choice for scarves, snoods, shawls, hats, blankets, shawl collars…
** Other reversible methods already exist, such as working cables over ribbing or brioche, and alternating cables over both right and wrong sides.
I discovered them in spring 2016 while experimenting with arans for a new stitch pattern. I did not manage to create what I intended – traveling cables framed in “beads”- but instead these stunning cables appeared! Since then, I have found a few cable patterns that have purl sts at the edges of the cables. The difference here is that this is a principle which can be applied to many kinds of cables.
How to make them?
Usually aran lines consist of 2 knit stitches that are moved over a reverse stocking stitch background. To convert them we are increasing the stitch count by adding two purl stitches – one at each side. Thus we get 4 stitches in the modified aran line: 1 purl, 2 knit, 1 purl. Each time we work these arans we are crossing all four stitches over the background stitch. Use a similar procedure for the cables: add one purl stitch to either side of the twisted stitches. For example, for a basic 2×2 cable, instead of 4 knit stitches, the new count will be 8 stitches – p1, k2, p1 & p1, k2, p1. When working the twist, the purls are moved with the knits, i.e. (p1, k2, p1) crosses over (p1, k2, p1). Thus a conventional 2×2 cable becomes a 4×4 HRC (High-relief Cable), see the chart below.
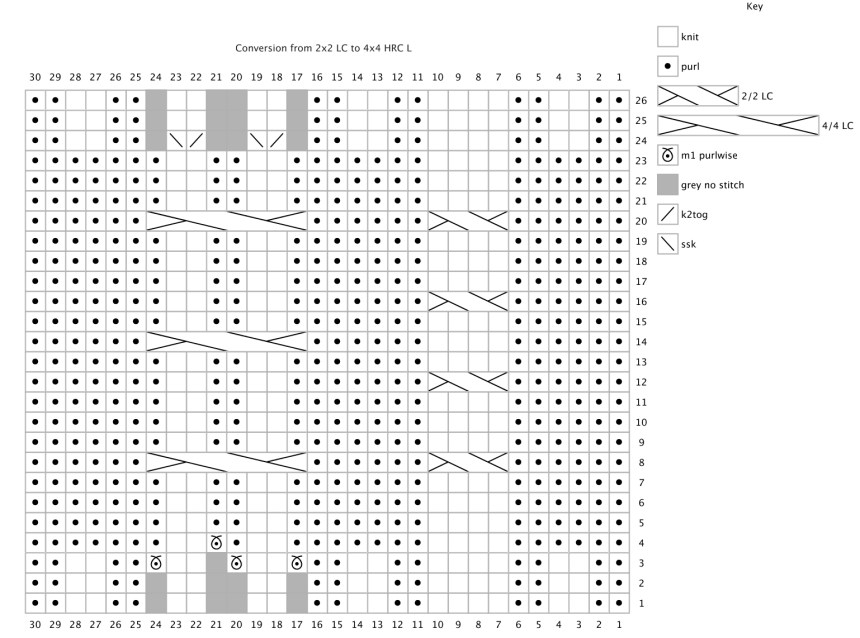
 Larger cables therefore have larger twists, a 3×3 cable has a 5×5 twist, for 4×4 cable it will be 6×6, and so on. With a triple cable, a stitch count of 2x2x2 becomes 4x4x4.
It is recommended to use a cable needle when working HR cables, even if you usually work cables without one. Not only are there more stitches being moved, but they are not all knit stitches, and if dropped of the needle the stitches will twist making it difficult to correctly pick them up.
When and how do you add these extra purls?
There is no need to recalculate the stitch count for your project normally, leave it as it is. For dense cable work, you may need to reduce the number of background stitches, see example hat below. The new stitches will be added immediately as arans or cables are started, and removed at the end. It is as if they never existed.
Imagine a hat: after making a ribbed brim, a cable stitch pattern is being set up. In this row/round, work yarn overs where the extra purls will be: before and after each cable part. In the next row/round, work each yarn over twisted to make an invisible increase. (Or use M1 increase from a twisted strand between sts.) Remember, they should be purl stitches on the right side. In case there are other increases or decreases in the set-up row due to your pattern, delay adding purl stitches – work them in the next row. Also, when you need to add two purl stitches at once, make only one increase, make the second increase in the next row.
When the cable pattern is finished, eliminate these additional stitches, hiding them behind the knit stitches. For a purl stitch before a cable part, knit together the purl stitch and the first knit stitch of the cable part (k2tog). For a purl stitch after a cable part, slip knitwise the last knit stitch of the cable part and then the purl stitch, then knit these together through the back loops (ssk).
Here is an example of converting an existing pattern with cables, the Maruna Hat by Irina Anikeeva (Vogue Knitting, Late Winter 2017). For comparison I knitted two hats from the same yarn: a HR cable version (left) and the original design (right). The HRC hat is slightly bigger due to the particularly large number of added sts, therefore you might consider reducing the number of stitches in the background space. The rule is: for a pattern with a lot of cables (and therefore a lot of added purl stitches), reconsider the number of stitches between cables.


How often to work HR cables?
To my satisfaction, it turned out that HR cables require fewer cable rows than conventional cables to achieve their optimum shape. Less time twisting means a quicker project!
Compare the central Horseshoe cables on both Maruna Hats above: on the conventional hat there are 4 twists, on the HR cable variation there are 3 twists over the same number of rows. I could work 4 twists but then they would be too compressed.
For conventional cables the golden rule is to count the number of twisted stitches and to work a cable row once every that many rows:
for 2×2: 4 sts = one cable every 4 rows;
for 3×3: 6 sts = one cable every 6 rows; etc.
Of course, the twists can be done more or less often than this, but the ‘one row per st’ rule is mostly used.
HR cables look their best when the cable row is worked less often than their conventional counterparts. Of course, they also have more stitches, and conveniently the same rule can be used to get well-balanced HR cables:
for 4×4 HRC: 8 sts = one cable every 8 rows;
for 5×5 HRC: 10 sts = one cable every 10 rows.
In any case, you can always adjust this number to suit your preference.
HR cables samples
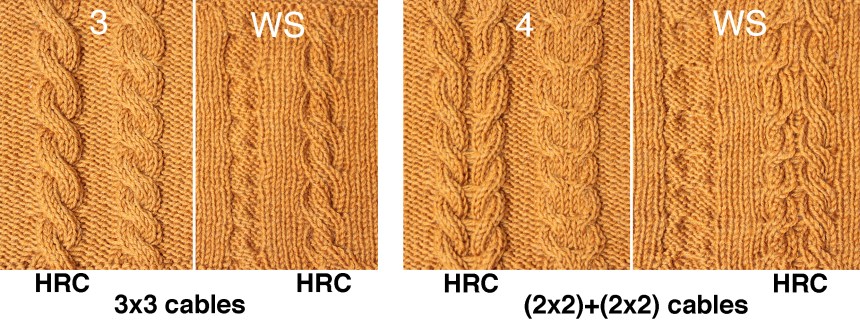
Here is the first selection of knitted samples featuring the new HR cables (on the left) alongside conventional cables (on the right) for comparison, all worked on reverse stocking stitch. Pictures of the wrong sides (WS) are included. (NB. As the wrong side is a mirrored image, the HR cables are on the right).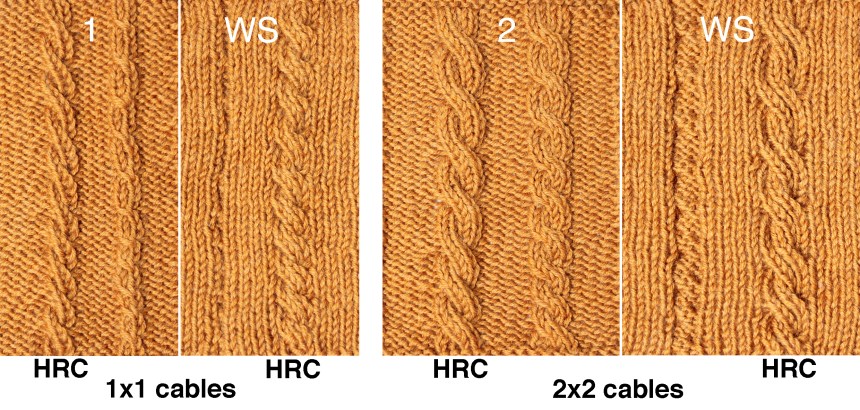
 Further down is the second selection of knitted samples featuring the new HR cables (on the left) alongside conventional cables (on the right) for comparison. Both varieties of the cables are worked on different backgrounds:
1. reverse stocking stitch,
2. stocking stitch,
3. rice stitch,
4. garter stitch,
so that you can see how these two types of cables interact with the background. Also pictures of both sides, the RS and the WS (marked a), are included to show the beautiful back of the reversible cables. (NB. As the wrong side is a mirrored image, the HR cables are on the right).
All sampled cables are knitted with two different vertical intervals (number of plain rows between cable/twists rows) to show how the shape changes. The lower cables have smaller vertical intervals than the upper ones.
HR cables, like conventional cables, can be left and right slanted, for example see the Horseshoe and Braid cables below.
The samples are:
Rope cables: 3×3 HRC and 1×1 cables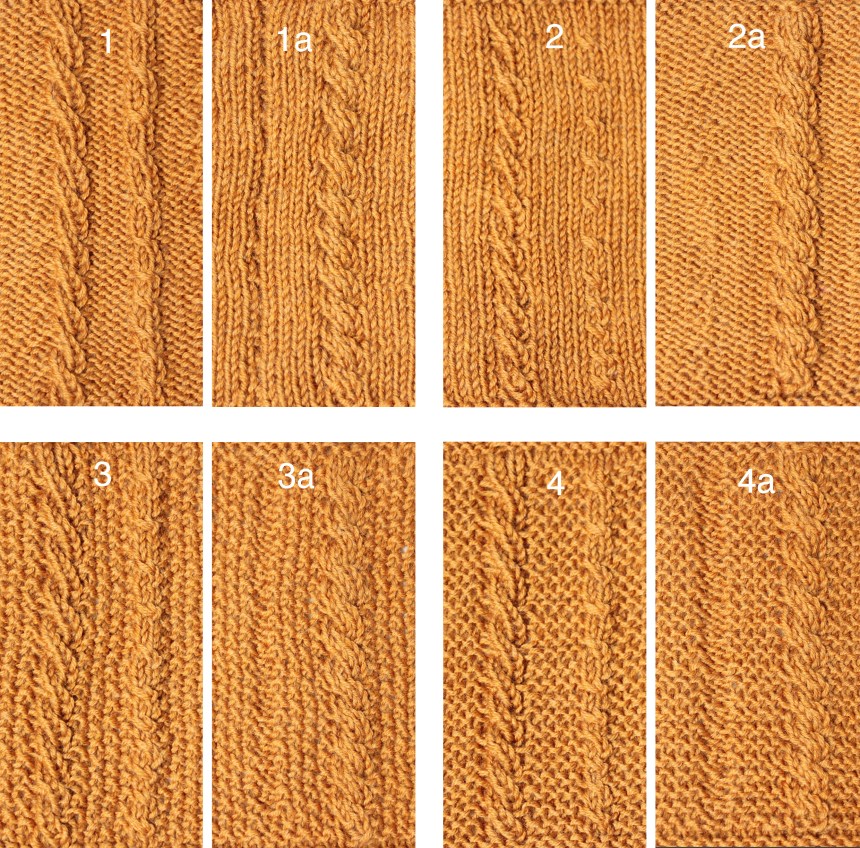
Rope cables: 4×4 HRC and 2×2 cables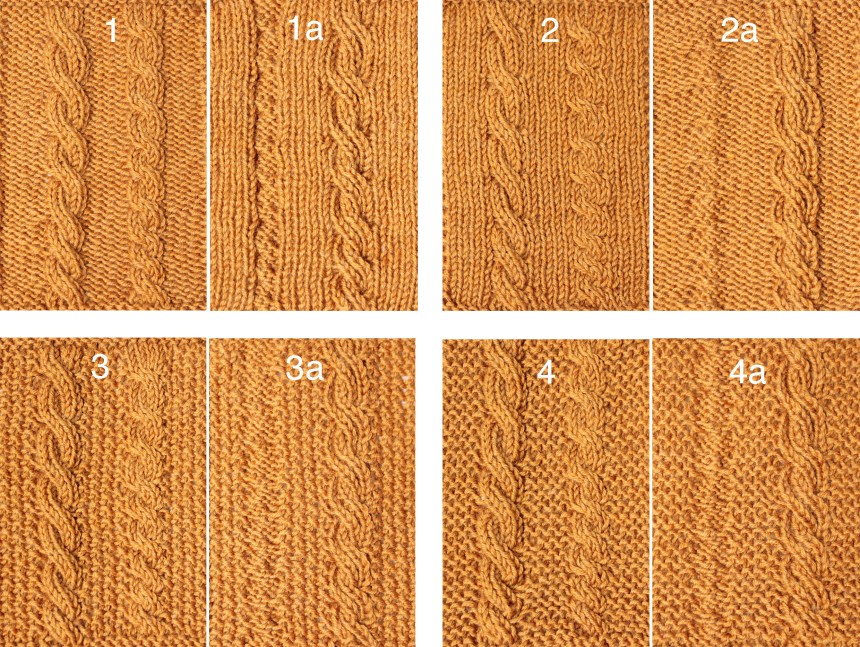
Rope cables: 5×5 HRC and 3×3 cables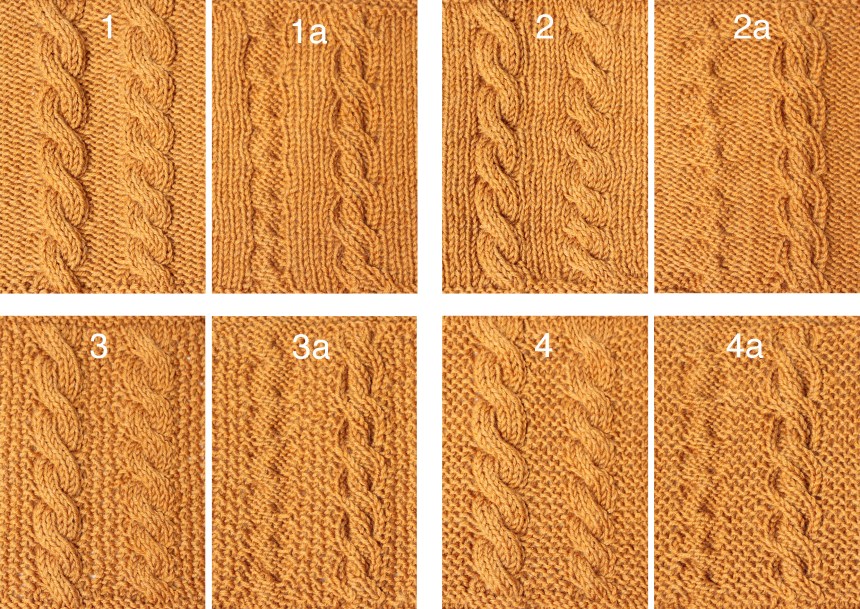
Braid cables: 4x4x4 HRC and 2x2x2 cables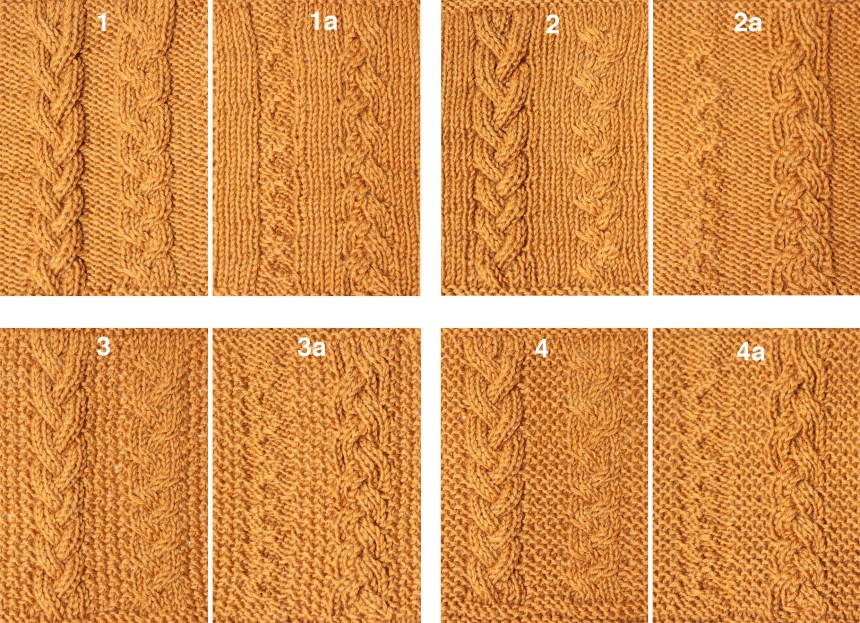
Horseshoe cables: (4×4)L+(4×4)R HRC and (2×2)L+(2×2)R cables (only on reverse stocking stitch)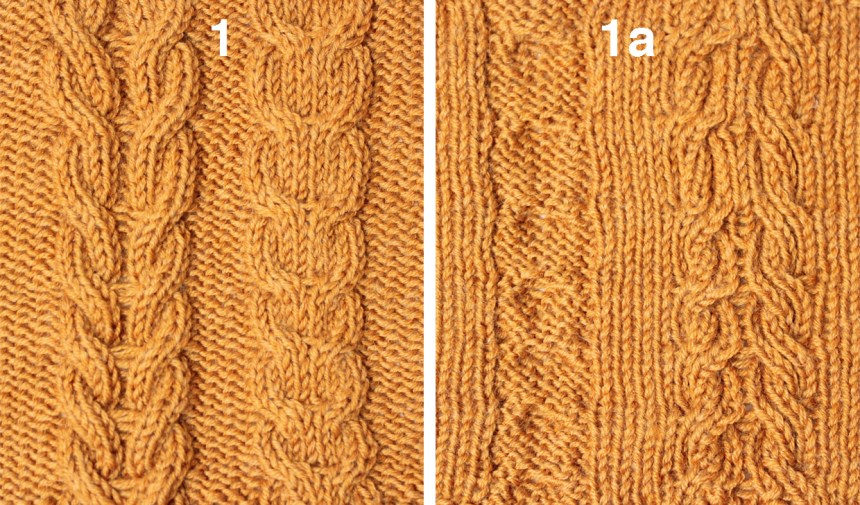 High-Relief cables projects
I designed a few scarves and hats to demonstrate how HR cables work and appear. They are all reversible – some with totally identical sides, some with different sides. See them on my blog posts and on Ravelry.
